

Enabling cgroup2
So you now have docker and podman setup and storing as overlay. from here you can expand the one or two commands you know and get installing apps. just write down the most frequent commands you use on a file so you can easily repeat each session.
TLDR what do I do
change bootloader
changes:/porteus cgroup_no_v1=all
cgroup2 should automatically mount
mount | grep cgroup
if its not mounted (you should see cgroup2) then do this
mount -t cgroup2 cgroup /sys/fs/cgroup
Also you have to do this one last step
mount --make-rshared /
look in earlier post about adding docker group. look in earlier post about adding subuid and subgid for podman. take it one step at a time and if you have any questions let me know and I can help
distrobox-1.4.1
distrobox-1.4.1
Last edited by dreadbird on 01 Feb 2025, 11:25, edited 6 times in total.
distrobox-1.4.1
Docker
we can use docker with distrobox because our user is in the docker group. this effectively makes our user root. now this is a vulnerability as distrobox is creating root containers. it says right in usage you cannot run distrobox as root. but docker is running as root. so there is a contradiction there.
anyway its not a big deal we have firewalls and other protections in place. we simply just want to use docker to use apps. This is fine for our usage.
distrobox-export --app geany
the link is broken

Notice that everything is being run as root
lets see what the link says
-n -- ' geany %F'
this is incorrect lets fix it
-n myfedora -- ' geany %F'
this is correct and the link works
Distrobox ----> root cant read parameter (its owned by root)
this is why the script fails. it doesnt expect you to be root
Podman
we can use podman with distrobox to create rootless containers. it creates them in ~/.local/share/containers so if any compromise happened to your container (say you were serving something or what have you). then its isolated from your root entirely.
distrobox-export --app geany
link works right away

podman is working better by being a user owned container and without needing to start a daemon. I will see what this means more and update.
Now this is all well and good but docker you can easily change the users in the docker file. so you can setup your containers properly and youre completely safe from online attacks.
Distrobox isnt sandboxed. It works better with podman because its implementing with your guest user. use its strengths to its ability. So have docker installed as well as podman and you can use both (podman being used by distrobox). There is no additional overhead and you dont have to worry about exposing something.
If you have both docker and podman installed
make one if not exists
~/.config/distrobox/distrobox.conf
container_manager="podman"
Or if you want to run only distrobox
(just move the docker modules out of your /modules)
distrobox is better implemented with podman and youll have a better experience
Rootless docker by running the daemon as user imo doesnt exist (unless I can use one command to get rootless docker I dont consider it a feature). Its nearly impossible to understand how to use their scripts. junk.
lets take a closer look at this
How is docker handling containers?

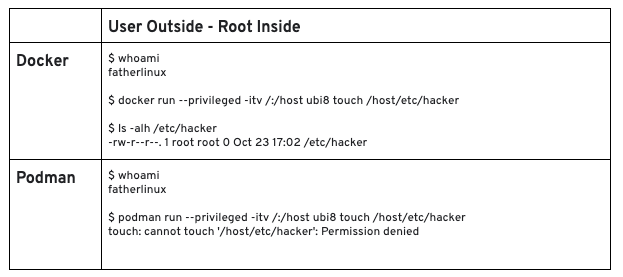
with docker the process starts as root and then cgroups
podman the process starts as user (uid 1000) and further processes started by the container are by a fictional user from subuid and subgid. So there are two measures of defense. your own non privileged user and another user that doesnt even exist on your system
So these layers of security. what does it mean?
You are only compromised if someone gains access to guest. guest is root because they belong to the docker group. Anyone using guest can go around and wipe your system or leak something via docker.
You are secure in that everything runs in cgroups pids ect. A root inside a container cannot be root on your machine. But someone on your machine can. and we all know that is entirely possible. Docker is going against standards in that we dont want to be root. we want to do everything sudo and go through the sodoer file.
Long and short of it
you can serve containers online with docker or podman. your safe.
if you have sensitive information you dont want to use docker until they implement true rootless. if someone gains access to your machine or a user on your system you compromised everything. this is how the data leaks happen everyone uses what is available or default without setting up security.
I tried dockers rootless install and I cant get the rootless daemon started it hangs on iptables cannot find ip exec. I can get it started with SKIP_IPTABLES=1. docker even says features are disabled in this mode.
so its not worth the effort. its a huge mess.
Docker has all the latest and greatest. Dont try to use it rootless believe me its not worth the time just not going to happen. and also rootless docker disables cgroups unless you run systemd for example. useless. if you want rootless use podman.
we can use docker with distrobox because our user is in the docker group. this effectively makes our user root. now this is a vulnerability as distrobox is creating root containers. it says right in usage you cannot run distrobox as root. but docker is running as root. so there is a contradiction there.
anyway its not a big deal we have firewalls and other protections in place. we simply just want to use docker to use apps. This is fine for our usage.
distrobox-export --app geany
the link is broken
Code: Select all
for i in $(docker container ls --format "{{.ID}}"); do docker inspect -f '{{.State.Pid}} {{.Name}}' $i; doneNotice that everything is being run as root
lets see what the link says
-n -- ' geany %F'
this is incorrect lets fix it
-n myfedora -- ' geany %F'
this is correct and the link works
Distrobox ----> root cant read parameter (its owned by root)
this is why the script fails. it doesnt expect you to be root
Podman
we can use podman with distrobox to create rootless containers. it creates them in ~/.local/share/containers so if any compromise happened to your container (say you were serving something or what have you). then its isolated from your root entirely.
distrobox-export --app geany
link works right away
podman is working better by being a user owned container and without needing to start a daemon. I will see what this means more and update.
Now this is all well and good but docker you can easily change the users in the docker file. so you can setup your containers properly and youre completely safe from online attacks.
Distrobox isnt sandboxed. It works better with podman because its implementing with your guest user. use its strengths to its ability. So have docker installed as well as podman and you can use both (podman being used by distrobox). There is no additional overhead and you dont have to worry about exposing something.
If you have both docker and podman installed
make one if not exists
~/.config/distrobox/distrobox.conf
container_manager="podman"
Or if you want to run only distrobox
(just move the docker modules out of your /modules)
distrobox is better implemented with podman and youll have a better experience
Rootless docker by running the daemon as user imo doesnt exist (unless I can use one command to get rootless docker I dont consider it a feature). Its nearly impossible to understand how to use their scripts. junk.
lets take a closer look at this
How is docker handling containers?
with docker the process starts as root and then cgroups
podman the process starts as user (uid 1000) and further processes started by the container are by a fictional user from subuid and subgid. So there are two measures of defense. your own non privileged user and another user that doesnt even exist on your system
So these layers of security. what does it mean?
You are only compromised if someone gains access to guest. guest is root because they belong to the docker group. Anyone using guest can go around and wipe your system or leak something via docker.
You are secure in that everything runs in cgroups pids ect. A root inside a container cannot be root on your machine. But someone on your machine can. and we all know that is entirely possible. Docker is going against standards in that we dont want to be root. we want to do everything sudo and go through the sodoer file.
Long and short of it
you can serve containers online with docker or podman. your safe.
if you have sensitive information you dont want to use docker until they implement true rootless. if someone gains access to your machine or a user on your system you compromised everything. this is how the data leaks happen everyone uses what is available or default without setting up security.
I tried dockers rootless install and I cant get the rootless daemon started it hangs on iptables cannot find ip exec. I can get it started with SKIP_IPTABLES=1. docker even says features are disabled in this mode.
so its not worth the effort. its a huge mess.
Docker has all the latest and greatest. Dont try to use it rootless believe me its not worth the time just not going to happen. and also rootless docker disables cgroups unless you run systemd for example. useless. if you want rootless use podman.
distrobox-1.4.1
Docker Rootless mode
Boot into always fresh or new changes folder
Note: this was an experiment. Rootless mode is junk in docker.
your docker.soc will be relocated into ~/.docker/run
all the docker binaries are in
~/bin
rootless containers are in
~/.local/share/docker/
make directory ~/.docker/run
it is an ephemeral directory that is expected to be used solely by the user
your docker.soc will be in here
start the daemon
./dockerd-rootless.sh --iptables=false
your dockerd is started as user
docker is now in rootless mode.
Im looking into enabling ip tables but you can see this takes too many steps. I can connect to the internet and everything works.
as guest
docker run -it fedora bash
goes to root inside the container. that is your are guest you are the root of your own container. not to be confused with your system root.
distrobox works even there is one catch. docker links guest to root inside the container. distrobox doesnt recognize this so you cant export your app nor run it as guest inside the container. But you can sudo su in the container. geany and it launches the gui. you can also
distrobox enter -- sudo geany to launch the app you could make your own link on your desktop.
so it is infact working but we are missing Cgroups. they implemented their method of rootless with systemd ONLY. so it doesnt count.
I am just going to use docker like its meant to be run and podman for distrobox. both are working great
Boot into always fresh or new changes folder
Note: this was an experiment. Rootless mode is junk in docker.
Code: Select all
export SKIP_IPTABLES=1

sudo sh -c "echo $(id -un):100000:65536 >> /etc/subuid"
sudo sh -c "echo $(id -un):100000:65536 >> /etc/subgid"

curl -fsSL https://get.docker.com/rootless | sh

export PATH=~/bin:/usr/sbin:$PATH
export XDG_RUNTIME_DIR=~/.docker/run
export DOCKER_HOST=unix://$XDG_RUNTIME_DIR/docker.sock

Note: put these in .bashrc so theyre set on launch
all the docker binaries are in
~/bin
rootless containers are in
~/.local/share/docker/
make directory ~/.docker/run
it is an ephemeral directory that is expected to be used solely by the user
your docker.soc will be in here
start the daemon
./dockerd-rootless.sh --iptables=false
your dockerd is started as user
docker is now in rootless mode.
Im looking into enabling ip tables but you can see this takes too many steps. I can connect to the internet and everything works.
as guest
docker run -it fedora bash
goes to root inside the container. that is your are guest you are the root of your own container. not to be confused with your system root.
distrobox works even there is one catch. docker links guest to root inside the container. distrobox doesnt recognize this so you cant export your app nor run it as guest inside the container. But you can sudo su in the container. geany and it launches the gui. you can also
distrobox enter -- sudo geany to launch the app you could make your own link on your desktop.
so it is infact working but we are missing Cgroups. they implemented their method of rootless with systemd ONLY. so it doesnt count.
I am just going to use docker like its meant to be run and podman for distrobox. both are working great
distrobox-1.4.1
Updated versions
Distrobox1.8.11 xzm
https://drive.google.com/file/d/1OtSmmP ... sp=sharing
maybe incompatible with podman < 5 just becareful recommend using with the new podman 5 below
slackbuild https://slackbuilds.org/repository/15.0 ... =distrobox
Podman 4.7.2 xzm (including all dependencies) (compatible with distrobox-1.4.1) havent tested with 1.8.11 distrobox
https://drive.google.com/file/d/1eG5smj ... sp=sharing
About this version of podman. I setup the config files for vfs and a few settings such as cgroups not systemd. it uses crun runtime by default. confirmed crun works with and without cgroups so that is default. runc is included if you want to switch to that. the way it is setup it will run on porteus. if you want to use overlay go to /etc/containers/storage.conf and change from vfs to overlay. recommend you do so and refer to setting up overlay in below post. I set it up so it works by default ie crun and vfs.
If I include the optimal config files there is a chance it may not work on every system. so my intention is the best default config. I can post my best configs which will match up based on requirements. Default ---> Optimal ---> Best. and you can progress to each setting as you learn to use podman
Changes since 4.5.0
conmon 2.1.8 from 2.1.7 (compiled)
runc 1.1.14 from 1.1.13 (compiled)
slirp4netns 1.2.2 from 1.2.0 (compiled)
libslirp 4.8.0 from 4.7.0 (compiled)
I just came to the realization that this slackbuild doesnt include fuse-overlayfs therefor its not needed. I tested it and it causes nothing but problems and its for older kernels
If you want to build it yourself
Compile requirement
google-go-lang-1.22.5
and dependencies listed in slackbuild ie libslirp
made a google go 1.23.4 xzm
https://drive.google.com/file/d/1sVeDvs ... sp=sharing
export PATH=/usr/lib64/go1.23.4/go/bin:$PATH
podman binary compile requirement (the actual podman.tar.gz slackbuild)
groff-1.23.0
man-db-2.13.0
slackbuild
https://slackbuilds.org/repository/15.0/system/podman/
General notes going forward I will be testing runc and see if its any better. ill have a general look at fuse-overlayfs and see if there are any updates for that. I will see exactly the best versions to use and then go back and check each config file. it works fine now but if I can optimize it in anyway ill do that and then update the .xzm.
Look at the list of files in 4.7.2. 1micu those are from 4.5.0 if you look at the list anything SBo is matched to 4.7.2 slackbuild. so 1micu uses crun instead of runc. I know for a fact there is fuse-overlayfs 1.12. so ill look into that next. 1micu yajl is a requirement of crun so they are both 1micu.
so we have two different directions crun or runc. im using crun because it works. the switch over to runc im testing atm.
crun is faster than runc and supports running without cgroups. so ill leave crun the default and include runc as an option.
I have fuse-overlay1.14 will test that out. cni plugins 1.2.0 ill build that and test it tomorrow. current state working fine. hope to get a mid tier config set. then can post once your up and running move to that config. you have to be very careful because its easy to break something.
( No point using lets jump to 27.2.0)
Docker 27.1.1 https://slackware.nl/slakfinder/show.php?pkg=3111938 Unknown dependencies available on salix
looks directly transferable to docker 27.0.3 from download links (July 2024)
Docker 27.2.0 https://slackbuilds.org/repository/15.0/system/docker/ slack build
containerd v1.7.21
will build tomorrow as the versions of podman available dont work with the new distrobox
docker 27.3.1 (unknown dependencies)
https://download.salixos.org/x86_64/15. ... 64-1gv.txz
Ill have a look at building a new podman dont know how far ill get. podman 5 has some major changes
https://github.com/mgoltzsche/podman-static <---- static binaries podman without systemd.
definately will check that out
specifically pasta and netavark
you can kind of see how docker has been adopted by slackware
Last edited by dreadbird on 01 Feb 2025, 11:01, edited 20 times in total.
distrobox-1.4.1
Distrobox update
the new distrobox has more security features implemented. as soon as you start a container it asks for a password for your new user. this is different from any other password. also I wasnt able to even sudo pacman -S geany or anything. 'guest is not in sudoer file. I had to use actual docker to gain entry into the container
docker exec -it myarch bash
nano sodoers
guest ALL=(ALL:ALL) ALL
distrobox enter myarch
password for guest? (the one it asked for earlier a new first time password)
now guest has access to the container
Interesting so they are going hard at security likely the gap in dockers root only containers.
You may also be able to add guest to the wheel group may work too havent tried it
So security at the gate. but a pain and slows you down. better hang onto your containers as you wouldnt want to set them up again
from the horses mouth
 BE CAREFUL : if you use docker , or you use podman /lilipod with the --root/-r flag, the containers will run as root, so root inside the rootful container can modify system stuff outside the container , Be also aware that In rootful mode, you’ll be asked to setup the user’s password , this will ensure at least that the container is not a passwordless gate to root, but if you have security concerns for this, use podman or lilipod that runs in rootless mode . Rootless docker is still not working as intended and will be included in the future when it will be complete.
So a root entering a container is root and distrobox doesnt add it to the wheel/sudo group. We are root because the process is the docker group ( docker group is sudo docker). so effectively youre entering the container incorrectly and distrobox blocks it. This is to prevent users abusing docker group privileges with docker. with podman you wont have this problem.
distrobox-1.4.1
Docker update
Docker 27.2.0 xzm (all dependencies) release 09 09 2024
https://drive.google.com/file/d/15eXSOy ... sp=sharing
default is vfs
go to /etc/docker/daemon.json to change driver
Docker also works with overlay2 and ignores fuse-overlayfs this is good as its not needed.
so if you have an overlay partition and mount it you can enable this by deleting /etc/docker/daemon.json
Do you need overlay? no its not needed for the typical user
I compiled with the slack build
https://slackbuilds.org/repository/15.0/system/docker/
Should I upgrade from 27.0.3 ? no its only 2 months difference I just put these here just in case a certain feature is needed.
What about 27.3.2 no need to jump there just yet. They released at the same time basically. 2024-09-20
This was available on getmod
Docker 27.3.0 xzm all dependencies release 09 20 2024
https://drive.google.com/file/d/18wkxS3 ... sp=sharing
Use 27.0.3 until alien bob releases the next major version. as slackware has adopted docker it will be up right away when needed
Last edited by dreadbird on 01 Feb 2025, 09:26, edited 21 times in total.
distrobox-1.4.1
Podman update
Podman 4.7.2 --- > 4.9.5 no difference so well stay at 4.7.2
Debugging this was left here for debugging purposes
working on making a podman 5 will update when available
** note only applies for Podman v5.3.2 **
This is debugging disregard this
The developer often includes breaking changes. where as v4.7.2 works fine look at the issue we encounter with the new version.
The developer included tighter control on cgroups. their code explicitly checks for memory option of cgroup2 devices. and bugs out Out of memory - failure.
I got around this by
/etc/containers/storage.conf
[storage]
# Default Storage Driver, Must be set for proper operation.
driver = "vfs"
vfs can create cgroups based on tmpfs.
for over lay you need specifically something more. I point to this.
root@porteus:/proc# zcat config.gz | grep CONFIG_MEMCG
CONFIG_MEMCG=y
# CONFIG_MEMCG_V1 is not set <----------- podman code glitches out if this is missing
root@porteus:/proc# zcat config.gz | grep CGROUP
# CONFIG_CGROUP_RDMA is not set
perhaps im not mounting all the devices. ill look if there is a cgroup2 mount script but the system mounts it automatically
I will post it on the bug page for v5.1 and see what if anything can be done
Its in the fuse overlay driver. this is what manages the container filesystems (overlay is a indepenant filesystem for the container) to the cgroups. So we can use the vfs driver with cgroups.
What does this mean? not a huge deal you can use vfs with cgroups but storage space is bigger.
If you want to use the overlay driver we need to get it to recognize the cgroup memory device.. now it may not use it but the code definately checks for it and if its not present you get a huge error
Found the reason the static binary has fusermount3 we already have that deleted it from the install and works!
Last edited by dreadbird on 01 Feb 2025, 03:39, edited 4 times in total.
distrobox-1.4.1
Podman 5.3.1 release date Nov 21, 2024
https://drive.google.com/file/d/1wBx2V4 ... sp=sharing xzm (configed for porteus) all dependencies
I took the static binaries and configured it properly
I am switching the default to vfs
reason? / is aufs in order to enable overlay you must have another partition xfs type d or ext4 that is independant from our system install
I will explain how to enable overlay below I set up podman to run on any porteus machine with v5.1
v5.3.1 the latest static release of podman
Configs set for
Setup rootless container directory
cgroupfs <------- not systemd good
subuid subgid <-- default guest 100000:65536
vfs
disabled helper program fuse-overlayfs
Major changes
pasta replaces slirp4netns
netavark replaces cni plugins
I build it as with the static binaries and configed it to match porteus and turned it into a xzm
One caveat with podman
To stop a container
podman kill -a (or --latest)
or podman ps
followed by podman kill pid
glitch in podman doesnt stop containers otherwise even through distrobox
only way to stop a container
tested with always fresh works perfect
Troubleshooting
try podman system migrate
clear out your container directory /.local/share/containers rm -r *
check permissions
ls -l /home/guest/.local/share
if not owned by guest
sudo chown guest:users /home/guest/.local/share/containers -R
Otherwise boot always fresh or start a new changes drive sometimes the configs conflict with an already existings setup.
Recommended
How do I enable overlay?
Lets discuss what overlay is. they used to use fuse overlayfs with older kernels to support overlay. but since 5.3 kernel we can use native overlays.
therefor fuse overlayfs is not needed. this is often the case where you think something is good but once you understand the principles you know you dont need fuse overlay fs.
so whoever make the static binary install thinks fuse overlayfs is good and enabled it in the configuration file. What does that lead to? A massive error
food for thought
lets enable native overlay
Make a partition for your overlay. xfs type d or ext4
note the name in gparted or sudo blkid to grab the name of the partition
ie /dev/sda4 etc
Lets clean out the vfs files first
cd /home/guest/.local/share
rm -r containers
now to setup the overlay
Try this and see if it works
sudo chown -v guest:users /home/guest/.local/share/containers
The default when mounting is 0755 for directories and 0644 for files. So no need to work about settings any permissions.
with ext4 your filesystem has the permissions so everything should be set automatically.
go to /etc/containers/storage.conf and change driver from vfs works to overlay
do the same for your root containers ie make another partition for your root containers
root containers are in
/var/lib/containers
You can also setup a rootless container directory on your porteus install drive via a symlink
Refer to this post to do that
viewtopic.php?p=101983#p101983
You changed a setting. extract the podman5.3.2.xzm and put that file in there /etc/containers/storage.cfg
and remake the .xzm
See automounting your overlay drives below we will make it so they are automatically mounted on boot.
if you want to build it yourself
if you want to make a .xzm just extract the tar from line 1 below
ie /downloads/
go to /etc/containers/storage.conf (config has all the configurations)
i ended up changing overlay to vfs for default compativility
change temporary storage to /run/containers/storage
setup the rootless storage path directory there (he had it disabled)
now scroll down to mount_program Line 126 comment this line out as we are not going to use fuse overlayfs
next for the other config file
go to /etc/containers/containers.conf (basic config full config https://github.com/containers/common/bl ... iners.conf)
review the config just the two are there nothing to change.
setup your subgid and subuid on your system and copy them into the /etc/ in the extracted /Downloads tar
remove fusermount3 from the /usr/local/bin (you could rename it to fusermount3.bak if you want)
done make xzm
Below installs it directly on your system
Static binary install of podman
viewtopic.php?p=101758#p101758
enter console
make sure you are not in su ( guest command line)
You have to comment out the line in /etc/containers/storage.conf mount helper program otherwise it will error out
change the driver to vfs for easier use. or overlay but then you have to setup overlay partitions so your choice
How to switch easier from vfs to overlay
podman system reset
This will deleted all containers pertaining to your /etc/containers/storage.conf ie vfs container removal
Now after it wipes everything make your change in storage.conf to overlay
and podman will be on a clean slate and shouldnt error
lets say you enabled a helper program and other features in storage.conf and you used podman for a while
podman system reset it parses the storage.conf for those exact settings
so it knows to remove the helper program ect.
The usage guide says do not make changes to storage.conf before first using podman system reset so it can start at square one
you make changes to settings and then it can work right away without erroring at you
and finally if youre having problems switching to overlay start with a new changes folder ie a clean slate
remember the difference between being able to do something like playing the piano is doing it 10000 times. so now you have podman and docker that works for what we need it to do just install an app. dont think about the other features those are for developers using podman and docker for work. let them set it up for you which is done when downloading docker and podman on a distro package manager. it works out of the box
Automounting overlay drives
go to /etc/rc.d/rc.local
or porteus settings center through app menu - startup scripts
#!/bin/bash
#
# /etc/rc.d/rc.local: Local system initialization script.
#
# Put any local startup commands in here. Also, if you have
# anything that needs to be run at shutdown time you can
# make an /etc/rc.d/rc.local_shutdown script and put those
# commands in there.
#system automount to /mnt/sda2 we dont want that lets unmount that
sudo umount /dev/sda2
#startup our podman install
sudo mount -t ext4 /dev/sda2 /var/lib/containers
sudo mount --make-rshared /
#with this you can use podman right away no need to type even the make shared. or start a daemon like docker.
Containers from distrobox
go.php?https://github.com/89luca89/dist ... ibility.md
https://drive.google.com/file/d/1wBx2V4 ... sp=sharing xzm (configed for porteus) all dependencies
I took the static binaries and configured it properly
I am switching the default to vfs
reason? / is aufs in order to enable overlay you must have another partition xfs type d or ext4 that is independant from our system install
I will explain how to enable overlay below I set up podman to run on any porteus machine with v5.1
v5.3.1 the latest static release of podman
Configs set for
Setup rootless container directory
cgroupfs <------- not systemd good
subuid subgid <-- default guest 100000:65536
vfs
disabled helper program fuse-overlayfs
Major changes
pasta replaces slirp4netns
netavark replaces cni plugins
I build it as with the static binaries and configed it to match porteus and turned it into a xzm
One caveat with podman
To stop a container
podman kill -a (or --latest)
or podman ps
followed by podman kill pid
glitch in podman doesnt stop containers otherwise even through distrobox
only way to stop a container
tested with always fresh works perfect
Troubleshooting
try podman system migrate
clear out your container directory /.local/share/containers rm -r *
check permissions
ls -l /home/guest/.local/share
if not owned by guest
sudo chown guest:users /home/guest/.local/share/containers -R
Otherwise boot always fresh or start a new changes drive sometimes the configs conflict with an already existings setup.
Recommended
How do I enable overlay?
Lets discuss what overlay is. they used to use fuse overlayfs with older kernels to support overlay. but since 5.3 kernel we can use native overlays.
therefor fuse overlayfs is not needed. this is often the case where you think something is good but once you understand the principles you know you dont need fuse overlay fs.
so whoever make the static binary install thinks fuse overlayfs is good and enabled it in the configuration file. What does that lead to? A massive error
food for thought
lets enable native overlay
Make a partition for your overlay. xfs type d or ext4
note the name in gparted or sudo blkid to grab the name of the partition
ie /dev/sda4 etc
Lets clean out the vfs files first
cd /home/guest/.local/share
rm -r containers
now to setup the overlay
Code: Select all
mkdir containers
sudo umount /dev/sda3
sudo mount -t ext4 /dev/sda3 /home/guest/.local/share/containers/             <------ mounts your overlay partition
sudo mount --make-rshared /
sudo chown -v guest:users /home/guest/.local/share/containers
The default when mounting is 0755 for directories and 0644 for files. So no need to work about settings any permissions.
with ext4 your filesystem has the permissions so everything should be set automatically.
go to /etc/containers/storage.conf and change driver from vfs works to overlay
do the same for your root containers ie make another partition for your root containers
root containers are in
/var/lib/containers
You can also setup a rootless container directory on your porteus install drive via a symlink
Refer to this post to do that
viewtopic.php?p=101983#p101983
You changed a setting. extract the podman5.3.2.xzm and put that file in there /etc/containers/storage.cfg
and remake the .xzm
See automounting your overlay drives below we will make it so they are automatically mounted on boot.
if you want to build it yourself
if you want to make a .xzm just extract the tar from line 1 below
ie /downloads/
go to /etc/containers/storage.conf (config has all the configurations)
i ended up changing overlay to vfs for default compativility
change temporary storage to /run/containers/storage
setup the rootless storage path directory there (he had it disabled)
now scroll down to mount_program Line 126 comment this line out as we are not going to use fuse overlayfs
next for the other config file
go to /etc/containers/containers.conf (basic config full config https://github.com/containers/common/bl ... iners.conf)
review the config just the two are there nothing to change.
setup your subgid and subuid on your system and copy them into the /etc/ in the extracted /Downloads tar
remove fusermount3 from the /usr/local/bin (you could rename it to fusermount3.bak if you want)
done make xzm
Below installs it directly on your system
Static binary install of podman
viewtopic.php?p=101758#p101758
enter console
Code: Select all
export VERSION=v5.3.1

curl -fsSL -o podman-linux-amd64.tar.gz https://github.com/mgoltzsche/podman-static/releases/download/$VERSION/podman-linux-amd64.tar.gz

tar -xzf podman-linux-amd64.tar.gz
sudo cp -r podman-linux-amd64/usr podman-linux-amd64/etc /
make sure you are not in su ( guest command line)
Code: Select all
sudo sh -c "echo $(id -un):100000:65536 >> /etc/subuid"
sudo sh -c "echo $(id -un):100000:65536 >> /etc/subgid"
podman system migratechange the driver to vfs for easier use. or overlay but then you have to setup overlay partitions so your choice
How to switch easier from vfs to overlay
podman system reset
This will deleted all containers pertaining to your /etc/containers/storage.conf ie vfs container removal
Now after it wipes everything make your change in storage.conf to overlay
and podman will be on a clean slate and shouldnt error
lets say you enabled a helper program and other features in storage.conf and you used podman for a while
podman system reset it parses the storage.conf for those exact settings
so it knows to remove the helper program ect.
The usage guide says do not make changes to storage.conf before first using podman system reset so it can start at square one
you make changes to settings and then it can work right away without erroring at you
and finally if youre having problems switching to overlay start with a new changes folder ie a clean slate
remember the difference between being able to do something like playing the piano is doing it 10000 times. so now you have podman and docker that works for what we need it to do just install an app. dont think about the other features those are for developers using podman and docker for work. let them set it up for you which is done when downloading docker and podman on a distro package manager. it works out of the box
Automounting overlay drives
go to /etc/rc.d/rc.local
or porteus settings center through app menu - startup scripts
#!/bin/bash
#
# /etc/rc.d/rc.local: Local system initialization script.
#
# Put any local startup commands in here. Also, if you have
# anything that needs to be run at shutdown time you can
# make an /etc/rc.d/rc.local_shutdown script and put those
# commands in there.
#system automount to /mnt/sda2 we dont want that lets unmount that
sudo umount /dev/sda2
#startup our podman install
sudo mount -t ext4 /dev/sda2 /var/lib/containers
sudo mount --make-rshared /
#with this you can use podman right away no need to type even the make shared. or start a daemon like docker.
Containers from distrobox
go.php?https://github.com/89luca89/dist ... ibility.md
Last edited by dreadbird on 05 Feb 2025, 02:53, edited 92 times in total.
distrobox-1.4.1
Distrobox 1.8.11 xzm
https://drive.google.com/file/d/1OtSmmP ... sp=sharing
built using the slackbuild https://slackbuilds.org/repository/15.0 ... =distrobox
If you want to build it yourself
make an .xzm of that
https://drive.google.com/file/d/1OtSmmP ... sp=sharing
built using the slackbuild https://slackbuilds.org/repository/15.0 ... =distrobox
If you want to build it yourself
Code: Select all
curl -s https://raw.githubusercontent.com/89luca89/distrobox/main/install | sh -s -- --prefix ~/Downloads/distrobox1.8.11 distrobox-1.4.1
Moving forward
xsessions labelled as experimental so not worth it currently. tried it out
Distrobox and learning how to use it
You can actually start an xsession and log right into the container.
https://cloudyday.tech.blog/2022/05/14/ ... s-awesome/
Just a good read but dont do it with icewm its way too basic. cant copy paste ect. I tried it out and I infact can log into the container by logging out of guest in porteus and selecting icewm in the session select. Having problems with flatpak the apps launch and work but for instance spotify wont open the host or container browser to login. so I cant login to the app. once this problem is solved will open up the possibilities further. The chrome browser I installed in the container didnt show anything.
This is what I think is happening
Spotify ----> Cant connect to system bus ie cant get to chrome ----> able to use spotify
shortwave works good so its getting the system bus maybe not the session bus
So if I can find the distrobox flag to enable dbus session should get spotify to work then this will be useful in allowing flatpak to work fully from inside a container.
it all lies in connecting to the host dbus session
distrobox documentation for gnome kde
https://github.com/89luca89/distrobox/b ... strobox.md
this may work
distrobox create -n mydistro --additional-flags "--env DBUS_SESSION_BUS_ADDRES=unix:///run/host/var/run/dbus/system_bus_socket" -i image
Last edited by dreadbird on 31 Jan 2025, 11:42, edited 3 times in total.
distrobox-1.4.1
Check this out
Enable dbus session inside the container
we will be using podman with a root container
everything is setup to work
if you changed the driver to overlay
make sure to mount your root container partition here (see above how to mount overlay partition)
/var/lib/containers
as guest
distrobox create -i registry.opensuse.org/opensuse/tumbleweed:latest --init --root --name mytumble
distrobox enter --root --name mytumble
sudo zypper install flatpak
sudo su
flatpak remote-add --if-not-exists flathub https://flathub.org/repo/flathub.flatpakrepo
flatpak install shortwave
exit
flatpak run de.haeckerfelix.Shortwave
think of it this way. the best problem to have is none. so creating a container should be for one process ie one application. you use it to launch an application on your host machine.
example we should use flatpak on our host machine and not inside the container. what if you cant install flatpak on the host machine?
then you use a container with an init system so programs can connect to a dbus session inside the container and forget about the host dbus session.
distrobox doesnt pass the regular dbus session by default. because it would break most containers
installed spotify with flatpak on tumbleweed
installed firefox through zypper
spotify and all flatpak apps work (found the session bus of container)
one problem
currently trying to get spotify to show up in a browser will update once i figure it out
It gets lost somewhere.
Conclusion: initfull containers are not what we need.
I got it to work
Lets do it so it works with porteus and not playing with systemd
distrobox create --additional-flags "--env DBUS_SESSION_BUS_ADDRESS=unix:path=/run/host/run/dbus/system_bus_socket" -n myfedora --root
distrbox enter myfedora --root
sudo dnf install flatpak
echo $DBUS_SESSION_BUS_ADDRESS
unix:path=/tmp/dbus-lAoOWxdMX5,guid=a9710d24da51bde6f0ca3ddd679aa153
sudo su
echo $DBUS_SESSION_BUS_ADDRESS
empty or incorrect
export DBUS_SESSION_BUS_ADDRESS=unix:path=/tmp/dbus-lAoOWxdMX5,guid=a9710d24da51bde6f0ca3ddd679aa153
flatpak remote-add --if-not-exists flathub https://flathub.org/repo/flathub.flatpakrepo
flatpak install spotify
exit
flatpak run com.spotify.Client
spotify will open in your host web browser!
this is absoluley useful you can install flatpak inside a container
Last edited by dreadbird on 01 Feb 2025, 13:18, edited 3 times in total.
distrobox-1.4.1
tested this to work as well
done with podman
distrobox create --additional-flags "--env DBUS_SESSION_BUS_ADDRESS=unix:path=/run/host/run/dbus/system_bus_socket" -n myfedora --root
distrbox enter myfedora --root
sudo dnf install flatpak
flatpak remote-add --if-not-exists flathub https://flathub.org/repo/flathub.flatpakrepo
flatpak install spotify
it will ask for root password
flatpak run com.spotify.Client
exit
logged out of container
sudo podman ps
sudo podman kill --latest
distrobox list --root
distrobox rm myfedora --root
this is all you need to do so by creating a root container we can access the system bus
Next update
Ill have a look at initful containers and their uses it looks like with those containers you cant access host processes. so if an application supported systemd only you could run it in an init container.
I will see the best uses for distrobox and post the guide to run different kinds of containers. there doesnt seem to be many examples it would be great to just copy and paste and get up and running
will look into logging into a container with xsession note distrobox says its experimental so not expecting much
Last edited by dreadbird on 01 Feb 2025, 03:48, edited 8 times in total.
distrobox-1.4.1
It looks like you can export a binary so lets say you need a command you can install it in a container and
distrobox-export --bin /usr/bin/mybinary --export-path $HOME/.local/bin
its a script that distrobox-enter e into the container
so if you have a command thats needed by a program and you cant find in pkgs.org you can install it in a container and export it for use on the host.
also there is a program called direnv that when you cd into a directory on your machine you can have it change your environment variables automatically. you can set it up to put your $PATH to $HOME/.local/bin. and use the binary from there.
then probably the biggest use would be for compiling source inside the container. could get you through that one missing dependency
then there are programs that simply you couldnt compile on your system and just have to compile and run from the container
distrobox-1.4.1
other uses and next update
we all know how much of a pain it is to setup configs for package management like slapt-get and all that
Why not make an image of porteus with slackpkg+ and getmod and everything already configured?
https://medium.com/@SofianeHamlaoui/con ... 1b1b637d75
https://stackoverflow.com/questions/423 ... ileSystem.
you could then just enter the container retrieve your packages etc
for your main porteus install slackpkg upgrade
then do random stuff inside a porteus container
so the base here is provide instructions so you can make your own image. then configure it for slackpkg+ ect and use it while using porteus.
that way you have a trusted image that you can then export as finalized and use through porteus 5.01 and 5.1
distrobox-1.4.1
arch aur repositiory Update 02/18/2025
Note:The initial guide used a root container
distrobox create -n myarch -i archlinux:latest --root
distrobox list --root
distrobox enter myarch --root
I found out you can use a rootless container
distrobox create -n myarch -i archlinux:latest
distrobox enter myarch
sudo pacman -Syy
sudo pacman -Syu
sudo pacman -S --needed base-devel git
cd ~
git clone https://aur.archlinux.org/yay.git
cd yay
makepkg -si
yay -S popcorntime
if it asks anything anything at all
A
or
enter
now we need libasound
yay -S libasound2-plugin-fftrate 1.6.3-1
press A to all
everything should work.
I believe you can also remove ~/yay/ <------- the package you built yay with
install vlc
sudo pacman -S vlc
go into popcorn time settings and tell it not to delete /tmp then exit
cd /tmp/Popcorn\ Time/
useful commands
yay search_term
yay -R package_name <--------- remove yay package
yay -Rns package_name <--------- delete package and its dependencies
yay -Sua <--------- upgrade yay packages
sudo pacman -Rs yay remove yay package manager
sources: https://www.youtube.com/watch?v=yRCh4bTgyt4
https://itsfoss.com/install-yay-arch-linux/
the only thing that was unclear was yay. what do you press? 1 3 ? so the above guide is proper instructions
Last edited by dreadbird on 19 Feb 2025, 20:09, edited 12 times in total.


