

well i need adapt this another tutorial for Debian 11 to Slackware(64) 15.0 / Porteus 5.0.1 (is on spanish) -> https://es.linux-console.net/?p=3614
But the important parts all intermediate users of gnu can understand, like :
* Oracle Java 8
* MySQL 5.6
* Tomcat 7.0.109
* Scripts for systemd with tomcat -> This is the part i need to adapt to the init of Slackware/Porteus
* Install OpenMRS
* Access OpenMRS from host to notice if working i need
* Start to configure OpenMRS.
----------------------------------------------------------------------------------------------------------------------------------------------------
I really write the follow text on spanish, but for this forum i translate to english in this post.
My first answer on this post, was be the Spanish Version of my tutorial :
OpenMRS on Porteus(64) 5.0.1 : On my case using VirtualBox 5.2.44 r139111 (Qt5.6.2) on Windows 7 Service Pack 1 Compile 2600 Ultimate 32 Bits.
OpenMRS - In Porteus, everything is quite comfortable.
The only thing I had to pass the files through cifs mount
Well because i am using VirtualBox, The Network configuration of VirtualBox
i suggest set to "Bridge Mode" and activate "Promicue Mode" to "Allow VM(s)"
Inside Porteus installed from Hard Disk Drive, i open a terminal wirh root privilegies and i use
the follow commands to mount cifs folder from my host folder :
Code: Select all
mkdir -p /media/cifs/Temporal
mount -t cifs //192.168.1.17/Temporal /media/cifs/Temporal -o vers=1.0,password=inukaze,uid=1000,gid=1000,rw,nounix,iocharset=utf8,file_mode=0777,dir_mode=0777,domain=REDLOCALOpenMRS Reqs :
* Java 1.7 min. (JRE/JDK)
* Apache / httpd
* MySQL / MariaDB
* Tomcat [Exust apache-tomcat (Req java 8) and tomcat-native, for this i need apache-tomcat]
OpenMRS : The "War" Version is the edition for Enterprise or Production Env
looks like the better option for create a custom server.
------------------------------------------------------------------------------------------------------------------
Steps
01 : Install Porteus
I install Porteus 5.0.1 From Usb, without make a Boot Patition
because i don't need it and less on VirtualMachine
Once the installation is complete, use the menu option to Shutdown porteus and remove usb.
Restart i access to Porteus i had installed on Hard Disk Drive
Once the system has started i open a terminal and execute the follow commands
Code: Select all
su

echo 'Update the available packages from repositories from two package manager of Porteus'
slackpkg update ; slapt-get -u

echo 'I will install the most popular text editors in case you need one'
slackpkg install joe vim nano

echo 'I will create a symbolic link to the text editor of my choice'
echo 'In this case it will be "joe", with the following command'
ln -sf /usr/bin/joe /usr/bin/editor

echo 'I want change the machine (host) name'
editor /etc/HOSTNAMETo assing the name "openmrs" to this machine
i restart the entire (virtual) machine
02 : Change Language (System / Interface, Keyboard), Set Time/Date
I change the language of Porteus from English To Spanish
i Set country to "Venezuela" and set Time to "UTC" America/Caracas
From The Menu -> "System Tools -> Porteus Settings Centre"
On the top, make click on the second button from left to right
To access to the options allow you change the language
03 : Disable things i don't use :
From the Menu -> "Preferences -> LXQt Settings -> Power Management"
I Uncheck "Enable Battery Watcher" inside "Battery"
I Uncheck "Enable Idleness Watcher" from "Idle"
04 : Download Files
I open a terminal and use the follow commands
Code: Select all
echo 'Create sub-dir called openmrs inside guest home folder and enter on it'
mkdir -p /home/guest/openmrs ; cd /home/guest/openmrs
echo 'Download The Files i need'

wget -c http://ftp.iij.ad.jp/pub/db/mysql/Downloads/MySQL-5.6/mysql-5.6.46-linux-glibc2.12-x86_64.tar.gz
wget -c https://enos.itcollege.ee/~jpoial/allalaadimised/jdk8/jdk-8u381-linux-x64.tar.gz
wget -c https://archive.apache.org/dist/tomcat/tomcat-7/v7.0.109/bin/apache-tomcat-7.0.109.tar.gz
wget -c https://sourceforge.net/projects/openmrs/files/releases/OpenMRS_Platform_2.5.0/openmrs.war/download -O openmrs.war

echo 'Solve a dependency of slapt-get, spkg looks like is ever use by slapt-get'
echo 'but for reasons i don't know, is not included on porteus 5.0.1'
wget -c https://download.salixos.org/x86_64/15.0/salix/a/spkg-1.7-x86_64-2gv.tgz ; \
installpkg spkg-1.7-x86_64-2gv.tgz ; ldconfig ; rm -rf spkg-1.7-x86_64-2gv.tgzInstall Java System-Wide
Create and edit the file java_home.sh on the follow path :
Code: Select all
editor /etc/profile.d/java_home.shCode: Select all
#!/bin/sh
#JAVA :
export JAVA_HOME="/opt/java"
export PATH=$JAVA_HOME/bin:$PATHi grant execution permission to this startup script
Code: Select all
chmod +x /etc/profile.d/java_home.shCode: Select all
tar -zxvf jdk-8u381-linux-x64.tar.gz -C /opt/Code: Select all
ln -sf "/opt/jdk1.8.0_381" "/opt/java"Code: Select all
source /etc/profile.d/java_home.shCode: Select all
java -versionjava version "1.8.0_381"
Java(TM) SE Runtime Environment (build 1.8.0_381-b09)
Java HotSpot(TM) 64-Bit Server VM (build 25.381-b09, mixed mode)
06 : Install & Configure "MySQL 5.6"
Resolve dependencies
Code: Select all
slackpkg install perl
slapt-get -i libaio numactl
I make the folder /usr/local/mysql
Code: Select all
mkdir -p /usr/local/mysqlCode: Select all
tar -xvf mysql-5.6.46-linux-glibc2.12-x86_64.tar.gzlike the destination folder is empty i not get error doing this
Code: Select all
mv mysql-5.6.46-linux-glibc2.12-x86_64 /usr/local/mysqlCode: Select all
cd /usr/local/mysqlCode: Select all
groupadd mysqlCode: Select all
useradd -g mysql mysqlFrom the current path where i am "/usr/local/mysql"
From root:root to mysql:mysql
Code: Select all
chown -R mysql:mysql *Code: Select all
./scripts/mysql_install_db --user=mysqlCode: Select all
chown -R root .Code: Select all
chown -R mysql dataCode: Select all
cp ./support-files/my-default.cnf /etc/my.cnfCode: Select all
cp ./support-files/mysql.server /etc/rc.d/rc.mysqldCode: Select all
chmod +x /etc/rc.d/rc.mysqldCode: Select all
./bin/mysqld_safe --user=mysql &I press enter three times
I set the password of root user of mysql
Its not the same root user from system
i set password 123456
Code: Select all
./bin/mysqladmin -u root password 123456Code: Select all
ln -s /usr/local/mysql/bin/mysql /usr/local/bin/mysqlWhen the restart was complete i open a terminal and use the follow command
Code: Select all
ps -A | grep mysql07 : Web Server httpd (Apache2)
In the same Terminal Window, i access to SuperUser account using "su" command
Code: Select all
suCode: Select all
slackpkg install httpd apr apr-utilI do the follow on the 100% manually way :
Code: Select all
mkdir -p /tmp/mariadb-10.5.22-x86_64 ; cd /tmp/mariadb-10.5.22-x86_64
wget -c http://mirrors.slackware.com/slackware/slackware64-15.0/patches/packages/mariadb-10.5.22-x86_64-1_slack15.0.txz
tar Jxvf mariadb-10.5.22-x86_64-1_slack15.0.txz
cd ./usr/lib64/
cp libmariadb.so.3 /usr/lib64/ ; ldconfig
cd /tmp ; rm -rf /tmp/mariadb-10.5.22-x86_64Code: Select all
chmod a+x /etc/rc.d/rc.httpdCode: Select all
editor /etc/httpd/httpd.confCode: Select all
#Error(es):
# AH00557: httpd: apr_sockaddr_info_get() failed for openmrs
# AH00558: httpd: Could not reliably determine the server's fully qualified domain name, using 127.0.0.1. Set the 'ServerName
# Solution for AH00557 & AH00558 :
ServerName 127.0.0.1Code: Select all
/etc/rc.d/rc.httpd startCode: Select all
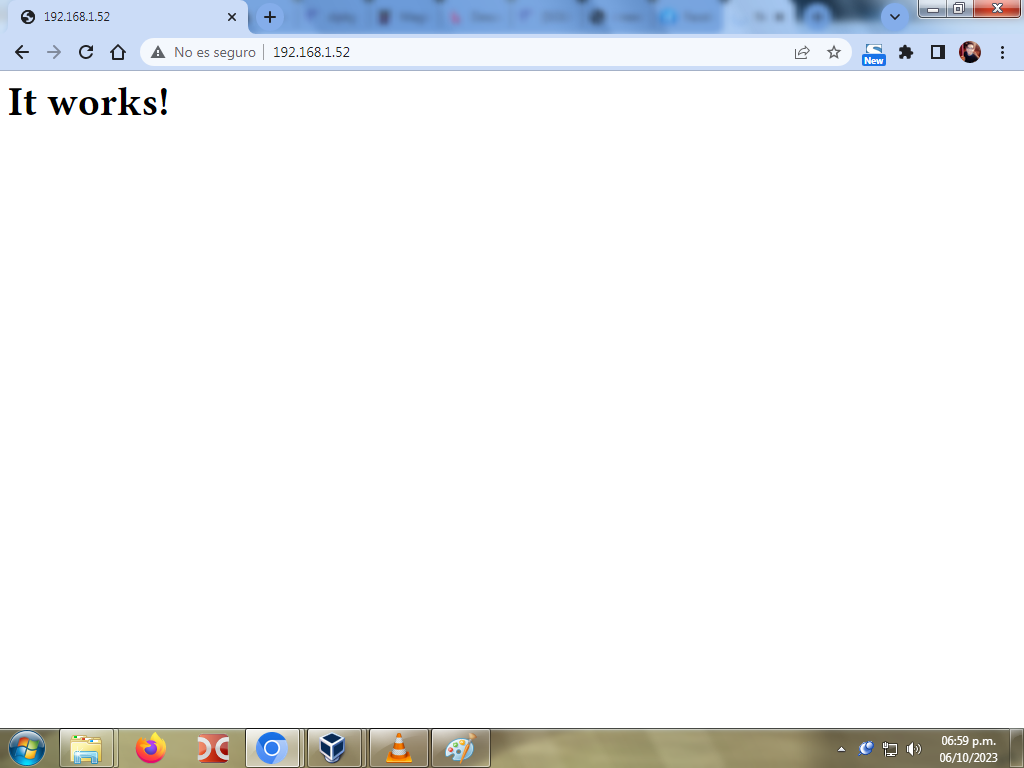
ifconfigusing http protocol from a graphical web browser, for example (Firefox / Chromium, etc) :
If you see the text "It Works!", is because is now completly configure and installed httpd (Apache2)
08 : Tomcat for Apache
i create the tomcat group
Code: Select all
groupadd tomcatCode: Select all
useradd -s /bin/false -g tomcat -d /opt/tomcat tomcatCode: Select all
cd /home/guest/openmrsCode: Select all
mkdir -p /opt/tomcatCode: Select all
tar -xvzf apache-tomcat-7.0.109.tar.gz -C /opt/tomcat/ --strip-components=1Code: Select all
cd /opt/tomcatCode: Select all
chgrp -R tomcat /opt/tomcatCode: Select all
chmod -R g+r confCode: Select all
chmod g+x confCode: Select all
chown -R tomcat webapps/ work/ temp/ logs/i know the variables i must set before start tomcat are the follow :
export JAVA_HOME=/opt/java
export PATH=$JAVA_HOME/bin:$PATH
export CATALINA_HOME=/opt/tomcat
export CATALINA_BASE=/opt/tomcat
export CATALINA_OPTS='-Xms512M -Xmx1024M -server -XX:+UseParallelGC'
export CATALINA_PID=/opt/tomcat/temp/tomcat.pid
export tomcat_pid="$CATALINA_PID"
export TOMCAT_USER=tomcat
Well by the moment i use that variables with values to use tomcat startup script
Code: Select all
export TOMCAT_USER=tomcat ; \
export JAVA_HOME=/opt/java ; \
export PATH=$JAVA_HOME/bin:$PATH ; \
export CATALINA_HOME=/opt/tomcat ; \
export CATALINA_BASE=/opt/tomcat ; \
export tomcat_pid="$CATALINA_PID" ; \
export CATALINA_PID=/opt/tomcat/temp/tomcat.pid ; \
export CATALINA_OPTS='-Xms512M -Xmx1024M -server -XX:+UseParallelGC'
And now use the tomcat startup script :
Code: Select all
/opt/tomcat/bin/startup.sh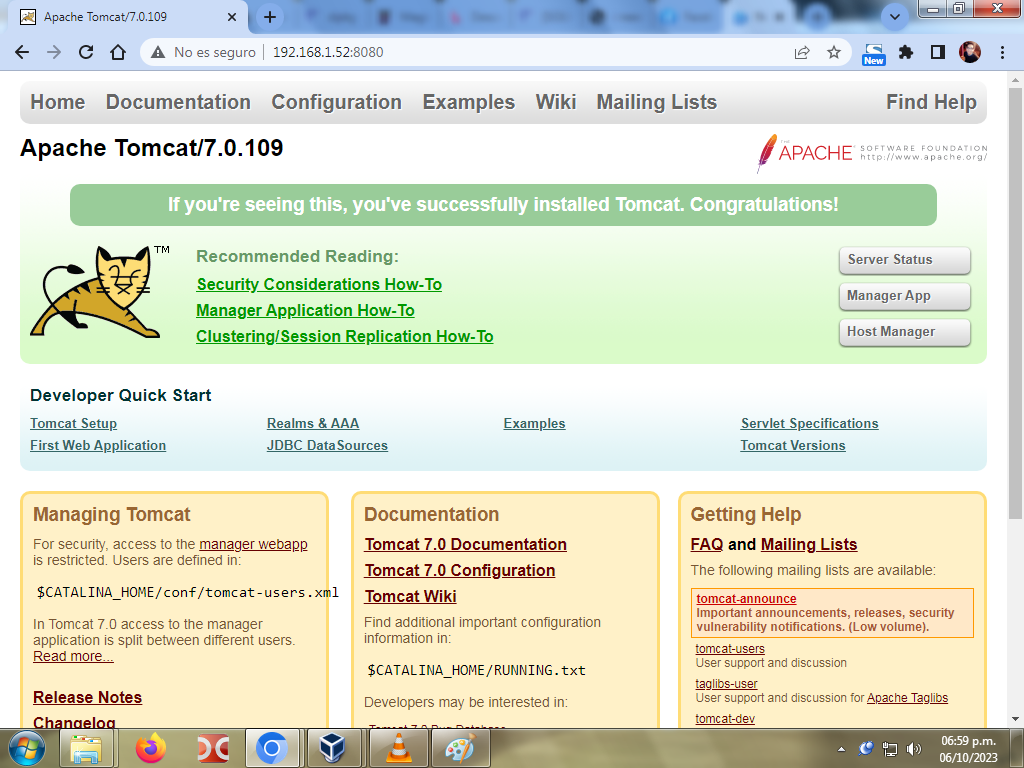
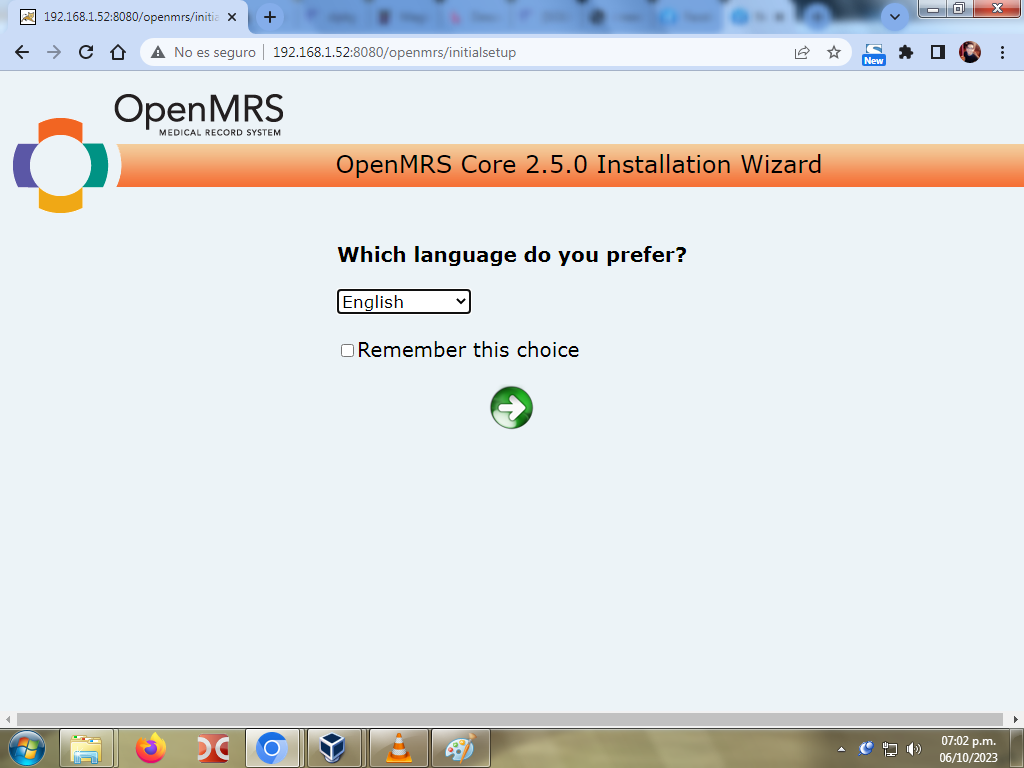
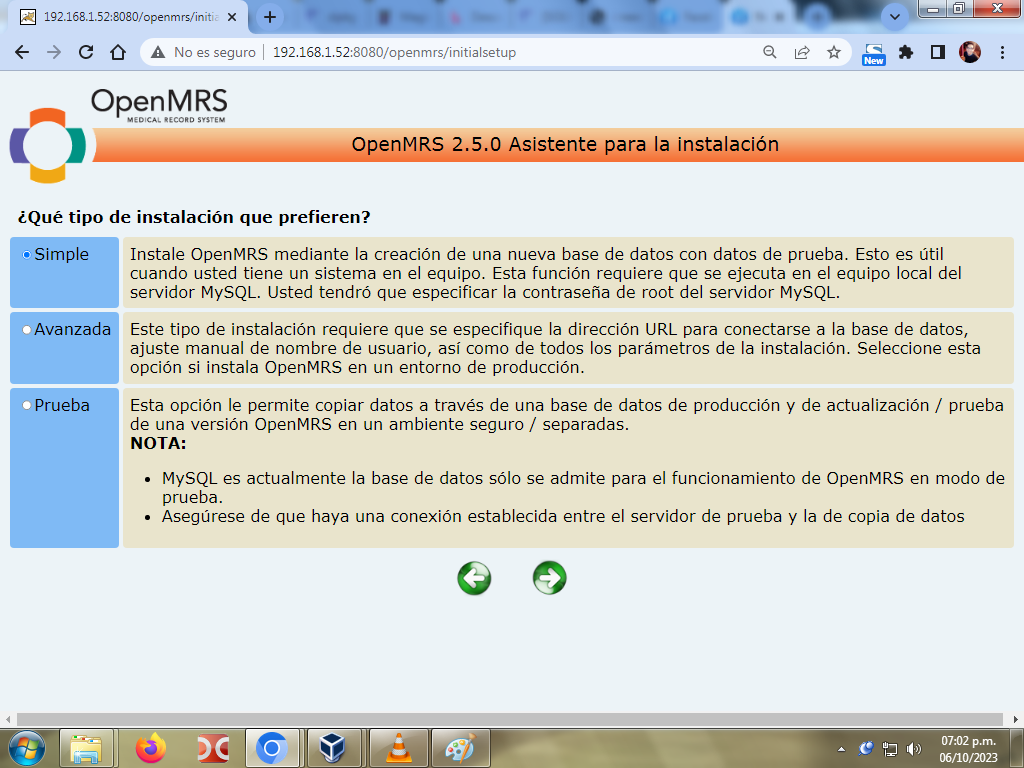
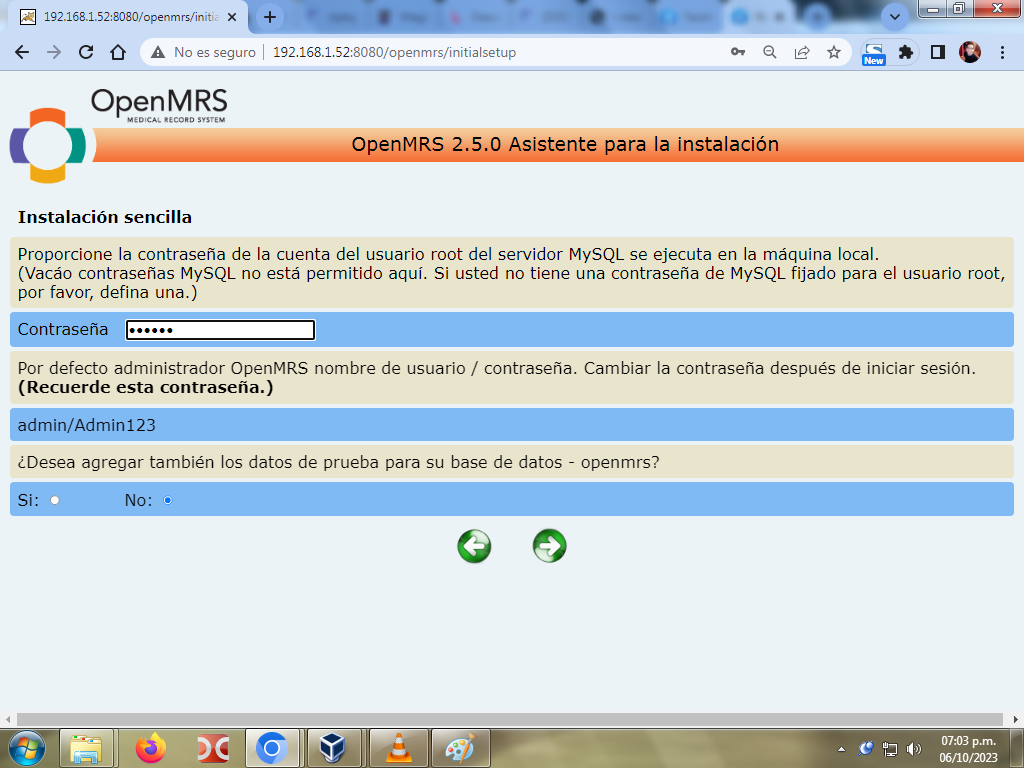
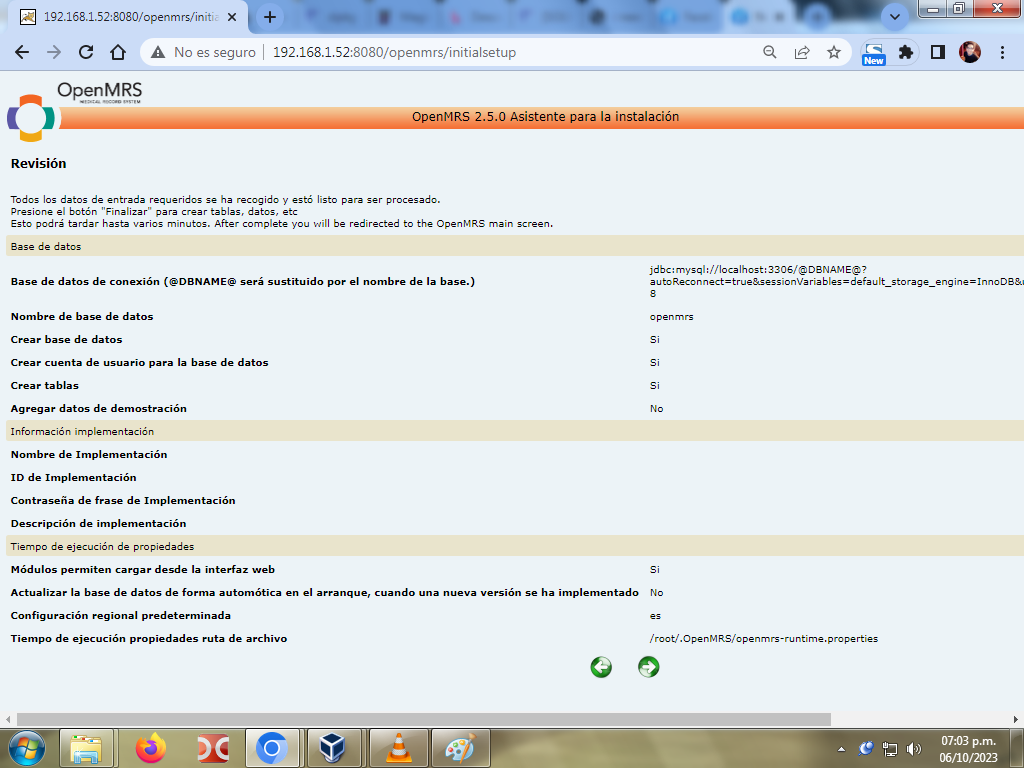
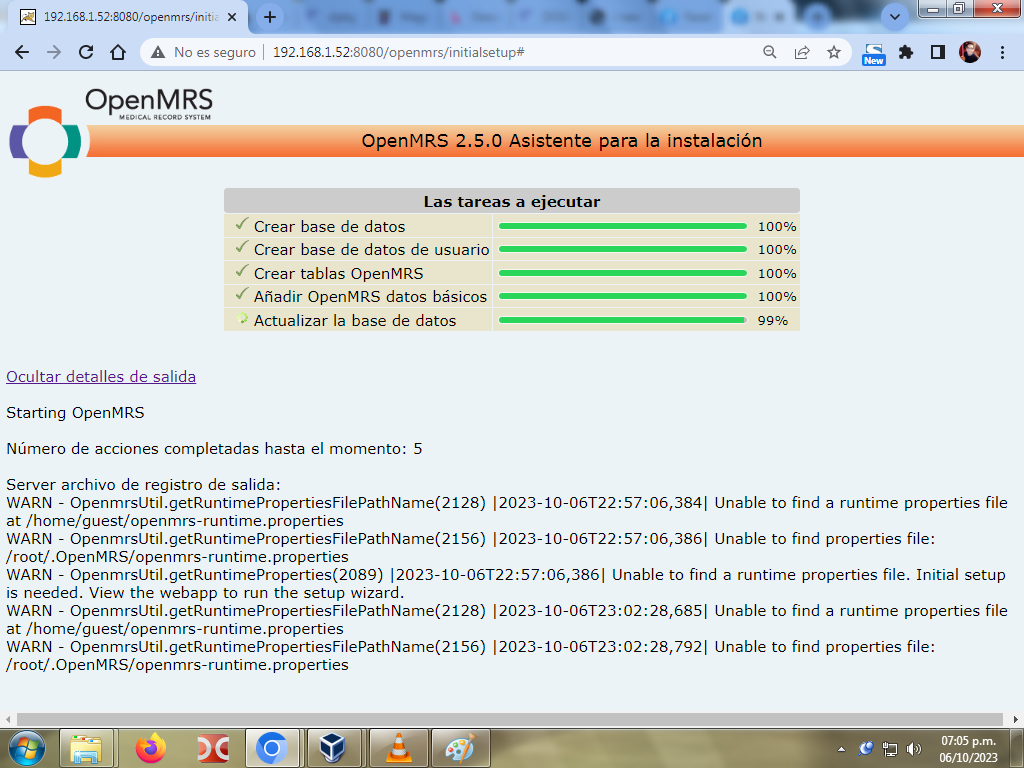
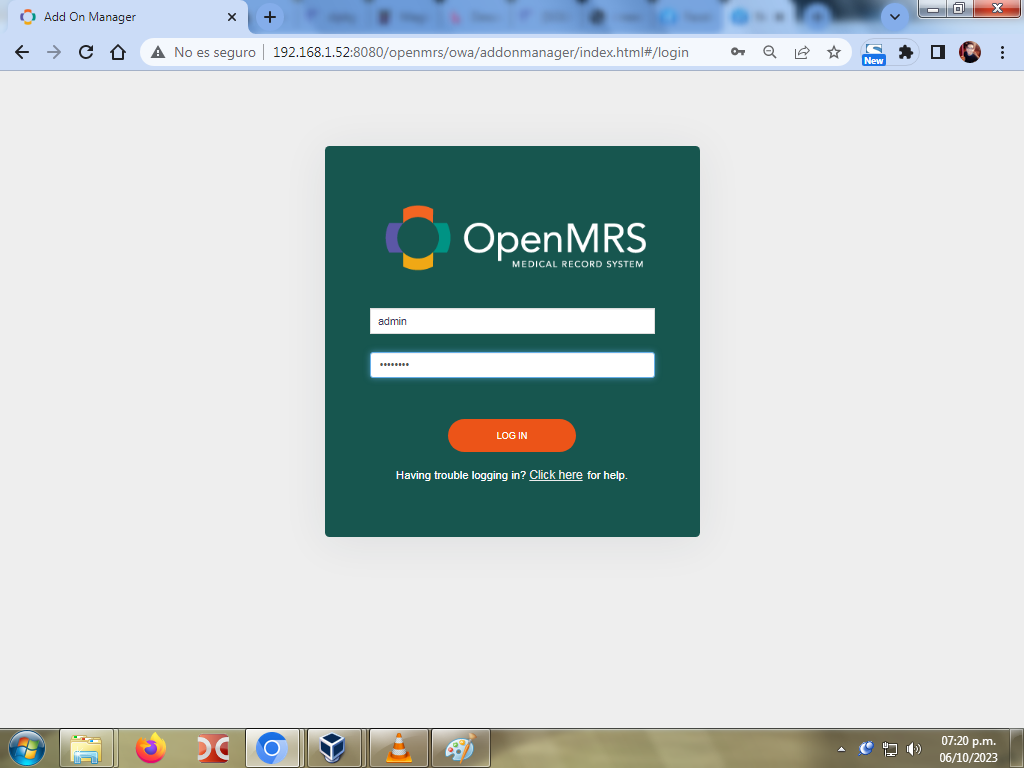
09 - OpenMRS :
Code: Select all
mkdir -p /var/lib/OpenMRS
chown -R tomcat:tomcat /var/lib/OpenMRS
cd /home/guest/openmrs
cp openmrs.war /opt/tomcat/webapps/
chown -R tomcat:tomcat /opt/tomcat/webapps/openmrs.war/root/.OpenMRS/modules
Well its time to test, i go the graphical web browser (Firefox, Chromium, etc):
now based on http://«IP»:«PORT»/openmrs i should use

I found the follow script -> https://gist.github.com/rougesheep/2e66 ... 949d898554
But does not work for my, i try to customize but does not work, i think is better i whole write
my own whole script for this
The rc.tomcat script i try to use, but does not work for me :
Code: Select all
#!/bin/bash
#
# description: Apache Tomcat init script
# processname: tomcat
# chkconfig: 234 20 80
#
#
# Copyright (C) 2014 Miglen Evlogiev
#
# This program is free software: you can redistribute it and/or modify it under
# the terms of the GNU General Public License as published by the Free Software
# Foundation, either version 3 of the License, or (at your option) any later
# version.
#
# This program is distributed in the hope that it will be useful, but WITHOUT
# ANY WARRANTY; without even the implied warranty of  MERCHANTABILITY or FITNESS
# FOR A PARTICULAR PURPOSE. See the GNU General Public License for more details.
#
# You should have received a copy of the GNU General Public License along with
# this program.  If not, see <http://www.gnu.org/licenses/>.
#
# Initially forked from: gist.github.com/valotas/1000094
# Source: gist.github.com/miglen/5590986


#Location of JAVA_HOME (bin files)
export JAVA_HOME=/opt/java

#Add Java binary files to PATH
export PATH=$JAVA_HOME/bin:$PATH

#CATALINA_HOME is the location of the bin files of Tomcat
export CATALINA_HOME=/opt/tomcat

#CATALINA_BASE is the location of the configuration files of this instance of Tomcat
export CATALINA_BASE=/opt/tomcat

#CATALINA_OPTS are the options pass to java
export CATALINA_OPTS='-Xms512M -Xmx1024M -server -XX:+UseParallelGC'

#CATALINA_PID
export CATALINA_PID=/opt/tomcat/temp/tomcat.pid
export tomcat_pid="$CATALINA_PID"

#TOMCAT_USER is the default user of tomcat
export TOMCAT_USER=tomcat

#TOMCAT_USAGE is the message if this script is called without any options
TOMCAT_USAGE="Usage: $0 {\e[00;32mstart\e[00m|\e[00;31mstop\e[00m|\e[00;31mkill\e[00m|\e[00;32mstatus\e[00m|\e[00;31mrestart\e[00m}"

#SHUTDOWN_WAIT is wait time in seconds for java proccess to stop
SHUTDOWN_WAIT=20

tomcat_pid() {
        echo `ps -fe | grep $CATALINA_BASE | grep -v grep | tr -s " "|cut -d" " -f2`
}

start() {
  pid=$(tomcat_pid)
  if [ -n "$pid" ]
  then
    echo -e "\e[00;31mTomcat is already running (pid: $pid)\e[00m"
  else
    # Start tomcat
    echo -e "\e[00;32mStarting tomcat\e[00m"
    #ulimit -n 100000
    #umask 007
    #/bin/su -p -s /bin/sh $TOMCAT_USER
        if [ `user_exists $TOMCAT_USER` = "1" ]
        then
                /bin/su $TOMCAT_USER -c $CATALINA_HOME/bin/startup.sh
        else
                echo -e "\e[00;31mTomcat user $TOMCAT_USER does not exists. Starting with $(id)\e[00m"
                sh $CATALINA_HOME/bin/startup.sh
        fi
        status
  fi
  return 0
}

status(){
          pid=$(tomcat_pid)
          if [ -n "$pid" ]
            then echo -e "\e[00;32mTomcat is running with pid: $pid\e[00m"
          else
            echo -e "\e[00;31mTomcat is not running\e[00m"
            return 3
          fi
}

terminate() {
	echo -e "\e[00;31mTerminating Tomcat\e[00m"
	kill -9 $(tomcat_pid)
}

stop() {
  pid=$(tomcat_pid)
  if [ -n "$pid" ]
  then
    echo -e "\e[00;31mStoping Tomcat\e[00m"
    #/bin/su -p -s /bin/sh $TOMCAT_USER
        sh $CATALINA_HOME/bin/shutdown.sh

    let kwait=$SHUTDOWN_WAIT
    count=0;
    until [ `ps -p $pid | grep -c $pid` = '0' ] || [ $count -gt $kwait ]
    do
      echo -n -e "\n\e[00;31mwaiting for processes to exit\e[00m";
      sleep 1
      let count=$count+1;
    done

    if [ $count -gt $kwait ]; then
      echo -n -e "\n\e[00;31mkilling processes didn't stop after $SHUTDOWN_WAIT seconds\e[00m"
      terminate
    fi
  else
    echo -e "\e[00;31mTomcat is not running\e[00m"
  fi

  return 0
}

user_exists(){
        if id -u $1 >/dev/null 2>&1; then
        echo "1"
        else
                echo "0"
        fi
}

case $1 in
	start)
	  start
	;;
	stop)
	  stop
	;;
	restart)
	  stop
	  start
	;;
	status)
		status
		exit $?
	;;
	kill)
		terminate
	;;
	*)
		echo -e $TOMCAT_USAGE
	;;
esac
exit 0i grant execution permission to this startup script
Code: Select all
chmod a+x /etc/rc.d/rc.tomcatCode: Select all
/etc/rc.d/rc.tomcat


